ESLife
Posts in the ES family category
Charming the Fiddle Worms - Fishing Bait
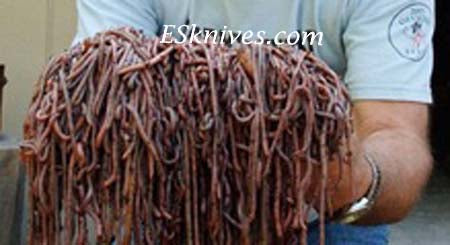
Fiddle worms make excellent bait for catfish, bass, bream, and trout. They are especially valuable because of their length: One worm, broken apart, will easily fill several hooks, and the worms are tough enough to stay securely in place. Charming worms is a southern tradition. Fiddling is still used in certain parts of the southeastern U.S. today, though it probably reached its peak during the 1960’s. Charmers are hard to find now a days.
In North Alabama this is how many of us catch our own bait. Where I come from Fiddling worms is considered a art. First time I saw worm fiddling was when I was around 10 years old. I was a city boy and we were vising my Uncle and Aunt on top of Brindlee Mountian in North Alabama, the foothills of the Appalachian Mountains. My Uncle showed my dad and I how it was done. In minutes we had a bucketful of worms, ready to go fishing.
My Uncle got us a bucket of worms with nothing more than an old rusty handsaw missing a few teeth and a bucket. He told us that the best time to go worming is in the spring but I have found that you can capture worms any time of the year, unless the ground is frozen.
There have been studies that confirmed worm grunters (another name for fiddling) have actually been tricking these worms into thinking they are being chased by its primary predator; moles. That’s why they appear above the ground almost like magic. They are in fear for their lives and quickly crawl from their burrows to escape.
Here is how we do it:
The success of worm charming can often depend on soil conditions, with charmers choosing damp locations or using water to attract the worms. A crucial factor in finding a good site to "play up" the worms is to have good moisture in the soil. Fiddle worms like the earth damp. In dry weather they move down into the lower parts in search of water. The first thing is to look for is good soil.
When you've located an area you believe there may be worms, begin to look for worm casings. Worm casing is another term or worm poop, which are small, round casings that the worms discharge as they munch on the soil. Casings can be found easily among decaying leaves at the base of a young trees.
Once you have found a small sapling, around three inches in diameter, it is time to start fiddling. Cut your sampling and leave around 18" for a the stump. Before you go out cutting peoples trees down, ask for permission.
Take an old wood saw, that the teeth have been dulled, and start fiddling by simply dragging the cutting edge back and forth across the top of the stump. The vibrations that are created travel down the tree's root system, sending tremors down into the earth that jolt the worms to the surface. In good damp ground you'll start seeing worms in five minutes maybe sooner. Dryer soil will take longer. Give it at least 10 minutes before looking for a new site. Just keep playing and worms should appear, they might be as far as 25-30 feet away. Fiddle worms on an average are between 12 and 15 inches long.
When your worms begin to surface, collect them in a bucket. Make sure your bucket has some holes. You don't want your worms to drown. Fill your bucket with dirt. You can keep them in the bucket for up to two months. Keep them watered which means keep them moist. Throw in a little cornmeal every once in a while.
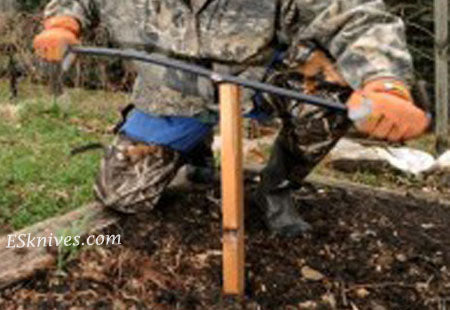
If you can't find a worn out saw, there are other methods of fiddling for bait. Instead of a saw you can use a metal bar and instead of a sapling you can use a wooden stake. Find a roughly 3-foot long wooden stake and pound it about halfway into the ground. Take a piece of flat, or round iron, roughly half as long as the stake and run it across the stake. You'll have to lean into it because you want those vibrations to go deep into the ground. This method will get good results.
There is a technique that involves a chainsaw. Take the chain off your chainsaw. Start your chainsaw and hold it against the ground. This usually brings up buckets of worms. A friend gave me a long metal pole that you plug in and shove it in the ground. I don't know if it works but I have it. I have known people to take a big rock and hit their sapling stump over and over to get worms. This technique is a little to rough for me.
Whatever technique you use it is best to start around sunrise. After 11:00 it is time to give up. My experience has been that temperature does not matter but the ground can't be frozen. You can sprinkle your spot with with water, tea or even beer for a slight edge. Some grunters poke their area with a pitchfork before fiddling. The point is to start fiddling, practice, experiment and create techniques that work for you.
Don't worry about having to many worms. Bait shops and fishing camps love to buy fiddle worms. You may be able to sell the leftovers. 25 worms in a large Styrofoam cup, a few contacts and you are on your way to worm profits. Get the whole family involved. Kids love to fiddle worms. Bring several buckets.
Mothers Day - Moms are Tough
Incredibly thankful for mom's. Your selfless daily acts make us stand in awe of your character, your service and the amazing example of the way you live. We want to honor mothers today.When we say Mothers, we also mean those women who mentor children... we mean the sisters and aunts who step in and care for children when it is necessary, and we mean the example of countless others who serve, guide, care for and love. It can take a village and there are many in our lives that have mothered us - today we remember and honor all of you.
Soldier reunited with her daughter at airport. Returning home. Motherhood moment.
Soldier sees his daughter for the first time - as she is delivered (seeing via ipad)
Mom's ears are amazing, you must admit it.
Then there is the classic tattoo image we think of as the "mom tattoo". You know the one... it is the chubby red heart with Mom splayed across it on a ribboned scroll. The tattoo caught on among servicemen during and after World War II. Many of these soldiers were so young when they were shipped off that a mother's love was more tangible than a girlfriend's. The "mom" tattoo image can sometimes symbolize not just affection, but also a love of country. There is a strong connection between motherhood and country.
The classic heart tattoo for Mom. Begun in WWII
How to Use The Backpacking Hobo Stove Great Survival Tool
In the last article I explained how to make a hobo backpacking stove and now in this posting it seems appropriate to explain the why.
There are many different types of stoves to take with you to the back country. There are some very expensive and fancy stoves out there. If money is an issue, there are some inexpensive stoves. There are many different types of fuels that can be chosen. White gas, butane, esbit, and wood are just a few. The problem with many of your stoves is the weight. Most weigh over a pound and then you have your fuel. The more days you are out the more fuel you have to carry.
The wood stoves on the market are rather heavy but there is no fuel to carry. Esbit stoves are light weight but there is fuel that has to be carried. Esbit tablets don't weigh much but when you are trying to shave off pounds from your pack ounces count. For every 16 ounces you can shave off you have dropped the weight of your pack by a pound. In your living room a pound does not seem like much. After several days and 15 miles a day on the trail, each added pound becomes a burden.
Being an ultra lite backpacker, I am always trying to find ways to shave off ounces. The backpackers kitchen is a great place to focus on unneeded weight. I wanted to be able to get my whole kitchen, which means, stove, pot, tinder, fire starter and other cooking supplies, down to 16 ounces. To do that I would have to give up carrying fuel.
I have always been intrigued by hobo stoves. They are usually made with coffee cans and coffee cans are to large and to heavy to carry in the woods. Besides metal coffee cans are hard to find now a days. What I needed was a hobo design but smaller.
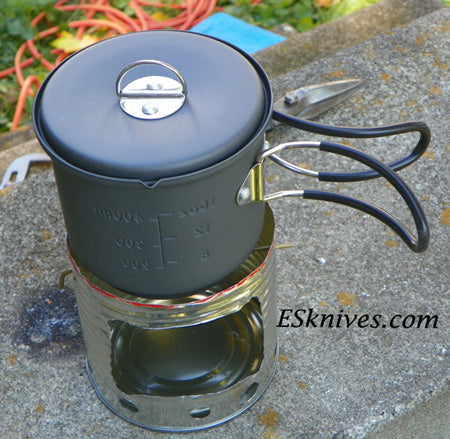
My son and I began to measure cans. I am sure we looked a little funny at the local grocery store measuring cans. We first measured soup cans. We could of made a soup can work but it was smaller than we wanted and our pots would not fit inside a soup can. After looking at many cans we decided on the classic V-8 can. The V-8 can was workable, had a good weight and our pots would fit in the can, taking little space in the pack.
After we built the stove we had to try it out. First we put our kitchen together and it fit in the pot tight. The stove and kitchen weighed in at 14 ounces. We beat our goal by 2 ounces. The only thing left was to try it out.
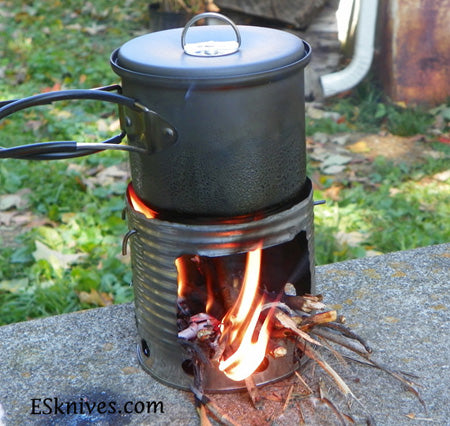
We got some simple tinder, cotton balls, and some small sticks. We started the cotton balls with our fire starter and started feeding sticks into the flames. It was a great success, better than I imagined. We had three cups of water boiling in 7 minutes. That is a lot of water to boil in a small amount of time.
We have now taken our stove out several times to the woods. Our stove has served us well, made some fantastic meals and hot beverages. The great thing about this stove is that you can find fuel that burns almost every where. You can take this stove on the mountain, on the plains, in the desert or even on the beach. I have been on the tundra and on the tundra burning materials can be harder to find. Materials can be found but you may want to carry fuel when backpacking on the tundra.
Here is our video showing the hobo stove at work.
Subscribe to our feed
Categories:
Recent posts
- Weekly Knife Giveaway - Claim your Entry19 February, 2016
- Survival with Bandanas23 November, 2015
- Win a trip to go support our troops09 October, 2015
- NASA Released Truly Breathtaking New Footage Of Earth in 4K13 August, 2015
- Kickoff to Summer - get outdoors19 June, 2015
- Stock Photos - group 707 June, 2015
- Stock Photos - group 607 June, 2015
- Stock Photos - group 507 June, 2015
- Stock Photos - group 407 June, 2015
- Stock Photos - group 306 June, 2015